|
|
 |
|
Here you will find detailed information on how to optimize your graphic card settings and in-game settings
for optimal performance in Allied Force. These instructions are not based on a specific card, but some options may not be
available to you. Please either keep this window open while setting up your options or print this page to guide you along. Under
normal circumstances, these suggestions should improve your sims performance. However, some may experience little
or no effect. Always backup your current settings.
|
|
Before you get into changing graphic options for the game, you first need to look
at the games system requirements. The following is direct from Lead Pursuit;
- Windows® 98 / ME / 2000 / XP
- Pentium® 4 1.5GHz or AMD Athlon® 1.2GHz CPU (recommend:
Pentium® 4 2.4GHz or AMD Athlon® 1800)
- 386 MB of RAM
- 1.5 GB Free Hard Disk Space (plus 500 MB for Windows
Swap File)
- 4x CD-ROM Drive, 100% Windows compatible mouse, keyboard
and joystick
- 1024x768 resolution capable color monitor
- 3D accelerated DirectX® 9 .0c compatible Video Card with
64MB of memory (recommend 128MB)
- DirectX® version 9.0c or higher compatible sound card
- 56Kbps ("hardware") modem for multiplayer options (recommended:
DSL/Broadband)
- DirectX version 9.0c (included) or higher.
- As a general rule of thumb, make sure you have the latest
Windows updates (including Windows XP Service Pack 2 and following updates), and latest drivers for your other hardware (graphics
card, sound card, joystick controller...)
The above specs are what you need to RUN the game. However,
I have listed some specs below on what I recommend you have to have a more smoother sim.
- Windows® XP
- Pentium® 4 2.10 GHz or AMD Athlon® 2.8 GHz CPU
- 512 MB of RAM
- 2 GB Free Hard Disk Space
- 4x CD-ROM Drive, 100% Windows compatible mouse, keyboard
and joystick
- 1024x768 resolution capable of 32bit color monitor
- 3D accelerated DirectX® 9 .0c compatible Video Card with
128MB of memory
- DirectX® version 9.0c or higher compatible sound card
- DSL or Broadband modem for multiplayer options
- DirectX version 9.0c (included) or higher.
With these specs on your computer, your game will
do great with the below changes. Follow the below procedures now for setting up your graphics for optimal performance in
the game.
00 - Important; This procedure does not contain detailed information on how to save your computer settings before these
changes. You have two options that you can take to ensure a safe return to previous settings in case of disaster. One, select
a "System Restore" point on your computer. You will need to go to your "Help and Support" section in your "Start" button to
get info on how to do this. Two, you can and should take written notes on what you change during this process and what things
were set at before changing. These changes have been tested several times and have not shown disruption of computer functions.
How ever, with any patches or modifications to your computer, do these things at your own risk. I am not liable for any damages
or problems that may arise due to personal hastiness. Always follow proper saving techniques and be cautious to changes. Thank
You!
01 - Computer Setup;
This section will show you what needs to be done in your advanced
desktop graphic settings to make sure you are in good working order. This section will not only provide you with instruction,
but with visual references to guide you along your path. Please note that all instructions and illustrations are provided
in the Windows XP environment and will be different for those of you that are running earlier versions of Windows. Windows
XP is the most used operating system of today and that is the reason for this. However, even though things will be slightly
different for those that run an earlier version, all options are still available but you will just need to look a little harder
to find what you need to work with. We are first going to go into your computers settings to change the way that your computer
runs your graphics card. This method will not only give your card boosted performance, but an overall computer enhancement.
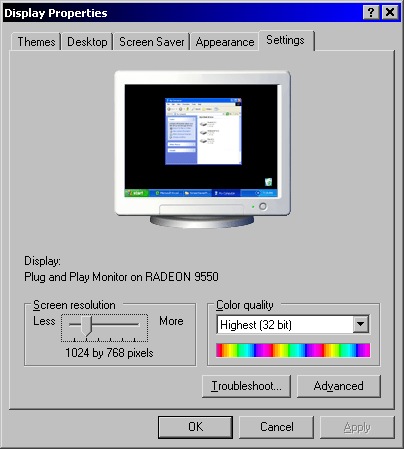
Close all windows on your desktop, except this one if you are reading it while you do the changes. Right click on your desktop
and select "Properties". Click the tab labeled "Settings" at the top right of this window:
Next, you are going to click the "Advanced" tab. This is where most of the
changes will be made. You will need to get a good idea of this area and how to navigate
around in it. Once you know where things are and what this area is about (reading about this area in your graphic cards manual will help greatly if you have not been here before) you will
then be ready to proceed. Once here, you will notice several tabs. We first want to
click on the tab labeled or similar to "Troubleshoot". If you do not have this tab please
navigate around until you come to a screen with these options:

Here, you see the correct way to have your graphics hardware setup for maximum operation. If yours
is not set right, you need to set it to the above look to have "Hardware
Acceleration" at "Full" and Turn ON "Enable write combining". Once these steps are done, click "Apply", but do not re-start if it asks you too, this will come later. Next you need to click
on the "Monitor" tab. It will look something like this:
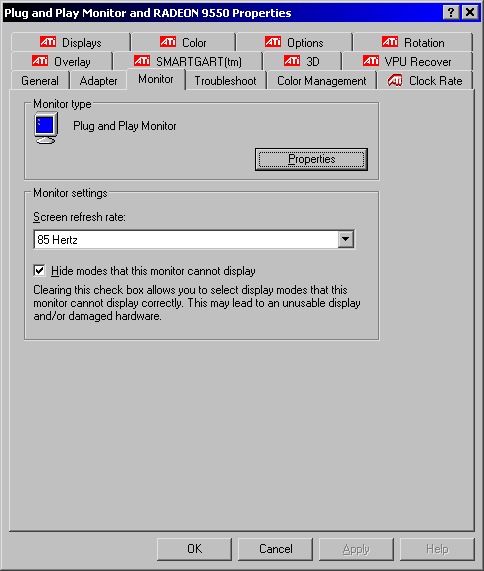
Once in here, you will need to make some slight changes. First, make sure that
you have a check mark in the box labeled "Hide modes..." It is then a good idea to
go into your "Screen Refresh Rate" selection and select a high rate that you are comfortable with. My highest is set to 85Hz; how ever some may not need their setting to be maxed out so change this
at your discretion. We are now going to look for a tab that you may or may not have.
Its label WILL be different for most users. Mine is currently called "Smart Gart". Browse through your available options until you (may) come across this type of tab
then you need to STOP:
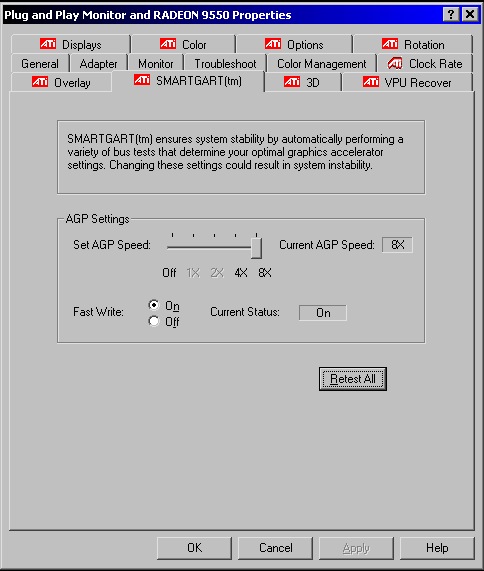
STOP! The reason for the high warning is so that you don't go gally banting around and making
changes too quickly here. You (may) see two options here. They are "AGP Speed" and
"Fast Write". AGP speed is just fine to change. I recommend setting it to the
max setting which in my case as you can see is set at 8X. Now, "Fast Write" is an option that I currently have ON but, will never mess with again and I DO NOT RECCOMEND that you change what ever yours is set to. I have learned
very hard lessons that this setting is VERY temperamental and if it doesn't like what
you change it to, you will get errors on your next re-start and will have
to go into safe mode to fix this. So, again, DO
NOT CHANGE "FAST WRITE"!!! Once done,
please click "Apply" and close all open windows.
02
- Graphic Card Setup;
We are now ready to make changes to your graphic card options. As noted above,
the place and look where of these options will be different from user to user. You
need to be familiar with your graphic card options menu as stated before in this manual in order to properly make these adjustments. Once you know your way around, we will begin. Right click on your desktop and select properties. Then again, click on the "Settings" tab, and
then the "Advanced" tab in the bottom right of the screen. Now, you need to navigate
to your appropriate area(s) that has your graphic card options. You can see what my
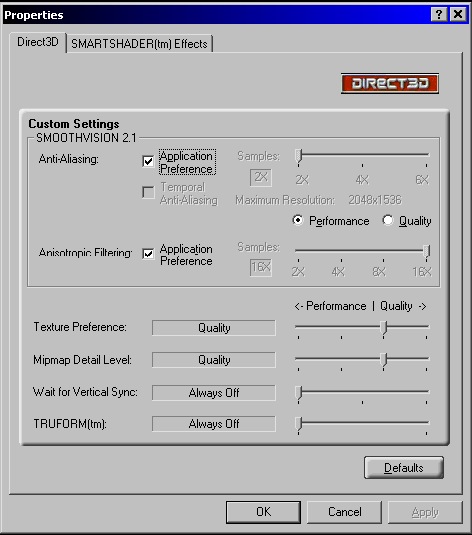
graphic card options area looks like from the picture below:
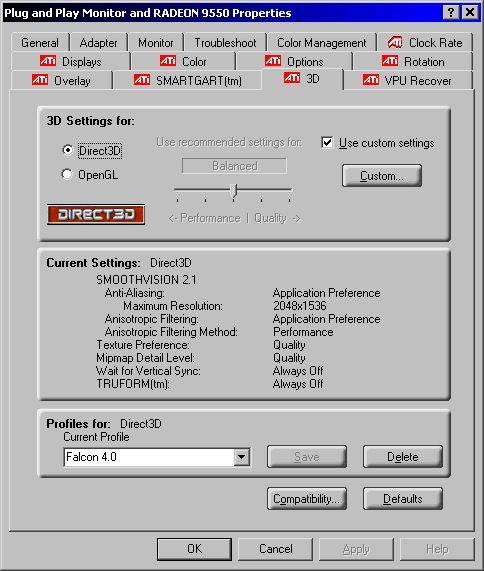
We are now ready to make the proper adjustments. Set your "Anti-Aliasing" to
"Application Preference". Set your "Anistropic Filtering" to "Application Preference".
Set your Anistropic Filtering Method (if available) to Performance. Set your "Texture Preference"
to "Quality". Set your "Mipmap Level" to "Quality". Set "Vertical Sync" to "Off". Finally, set your "TRUFORM" (if available) to "Off". Once these changes are done, click "Apply". Also, you will
want to save these settings to something you will remember such as "Falcon 4.0" as
you can see that I have done above in my picture. For Falcon 4.0, you only need to make these changes
to Direct 3-D as it is used in the game and OpenGL is not. In the below picture, you can see what my screen looks like in the changing
of these options:
Once this is all completed, you need to click "Apply" and then close all open
windows.
03 - Game Graphics Setup;
We are now ready to make the final changes to your games options. These last steps to getting your game in the proper FPS order will be simple and fast,
so pay quick attention! Now, you need to do what else, but start your game! These
steps occur in-game and you might want to print this section of the manual for reference. Once you're in the game, navigate to the left Menu and select Setup, then the Simulation tab at the top. Your screen
will look like this;
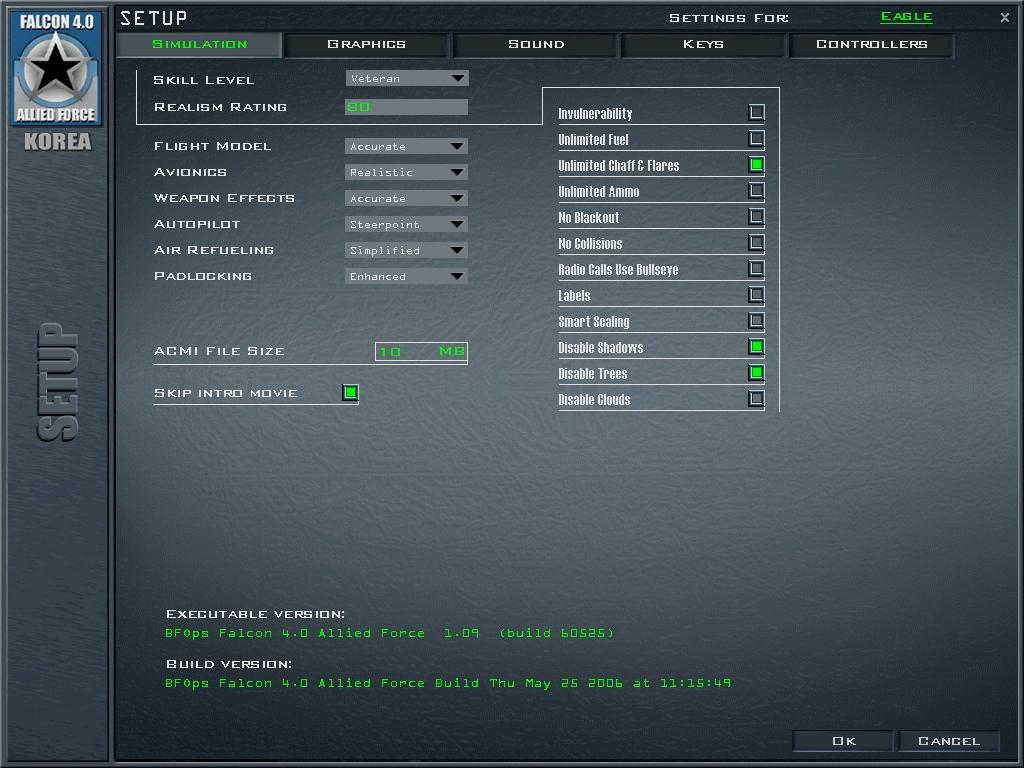 This screen accurately represents what you should have selected for your game. There are 3 options here
that pertain to graphic settings. These settings are the last 3 select boxes on the right of the screen. These are Disable
Shadows, Disable Trees, and Disable Clouds. For a high FPS I recommend to select all these things. However, with the
selection of these options, causes a Newton Law, aka, results in opposite but equal graphic changes in the game. Below is
the list of changes that take place due to each item being disabled;
Disable Shadows - Turns off all shadows what so ever in the game.
Disable Trees - Turns off trees in the game, and also turns off fences around airbases.
Disable Clouds - Turns off all clouds in the game. This will also cause you to have clear sky's all the
time and the game weather effects will not come into play.
If you are like me and you want weather, you can disable all except Clouds so that you can have your weather. Having
clouds on does not affect FPS much at all. An average FPS loss with clouds on is 5. With trees on and or cloud shadows
on, this affects FPS greatly in the range of 10. You should have at least 1GB of RAM and a fast graphics card to be able to
have all three items on and still get good smooth game play. Next, you need to select the Graphics tab at the top of the screen.
Your screen will look like this;
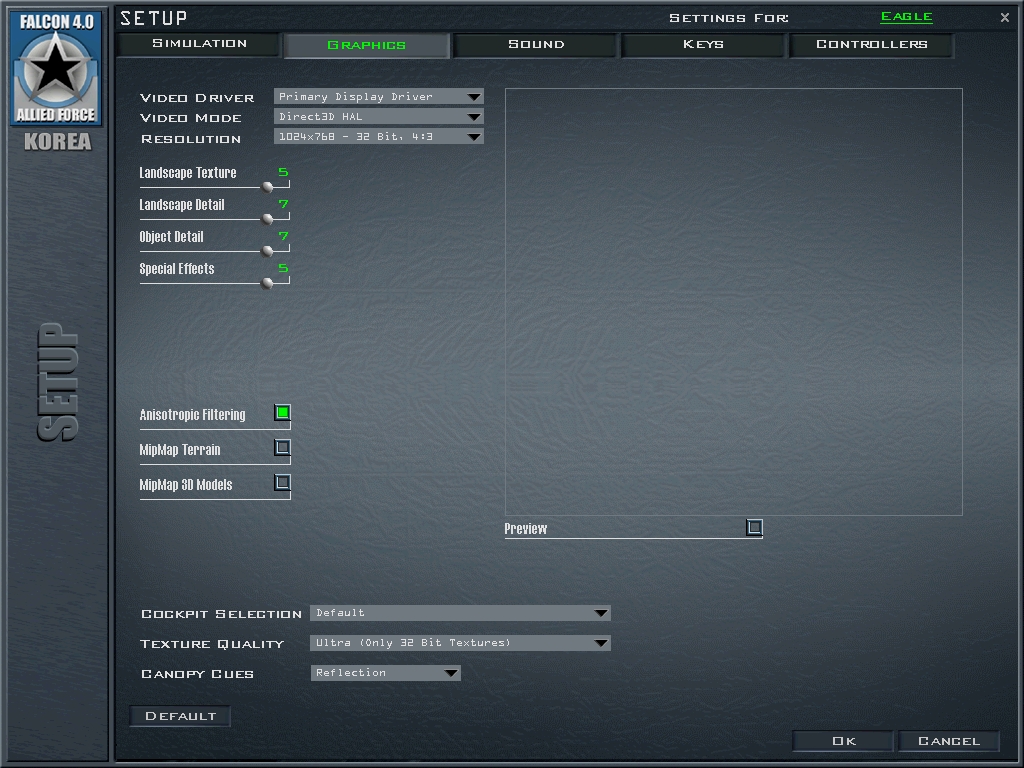
This screen has all the graphic choices for the game. My recomendations are also selected in this view. What you see selected
is what I recommend to have. See below for the details on these options;
Video Driver - Your current graphic processor.
Video Mode - Direct3D Hal is best for Allied Force.
Resolution - Screen resolution for the game. Recommended for best text and FPS is 1024 X 768 at 32bit color.
Landscape Texture, Landscape Detail, Object Detail, Special Effects. It is recommended that you max all these sliders.
Of course, lowering them will cause each items loss of quality too. Resulting from lowering these sliders may actually cause
a DROP in FPS. Therefore, it is recommended to keep these high. Some though may get an INCREASE in FPS while lowering these
sliders. It's your choice.
Anistropic Filtering - This needs to be turned on. It may cause crazy effects in the game if turned off.
Texture Quality - The recommended setting is 32bit. However, lowering this to 16bit will result in higher FPS but as always,
lower color quality of the game.
Canopy Cues - The reflection setting will be great for you and give you a sense of being in a cockpit. Turning this off
and or switching to the other setting will result in FPS gain but the cockpit glass reflections will be off. You will seem
like your flying in an open air canopy.
Preview - With this selected, as you can see, it will show you the results of your options that are being changed.
Mipmap Terrain - It is recommended to turn this off in order to allow your specific graphic card settings in Windows to
take effect. Otherwise, this will overwrite some of the settings we previously made.
Mipmap 3D Models - It is recommended to turn this off in order to allow your specific graphic card settings in Windows
to take effect. Otherwise, this will overwrite some of the settings we previously made.
That will do it for your graphic setups. All options and selections are at your own will. Make changes as you see fit and
do accordingly.
04 - Final Words;
That should do it for the Graphic Selections for your Allied Force game!! Please note, that these changes to your system
and game are suggestions only. All items and options have undergone testing and been found to be compatible on most user computers.
As with any game and computer changes, make backup's and save previous data prior to doing these steps. If any problems arise
after these changes to your computer, I am not responsible and will not answer trouble shooting questions. These steps should
help you gain more FPS in the game and help improve performance. Please note, these changes are meant for a mix of higher
FPS and quality for the game under the above system requirements or higher. As previously stated, it is HIGHLY recommended
to have the above system specs that I have written out and not just the ones by Lead Pursuit. Allied Force gets its power
mainly from two places. One is your computers processor (speed) and your system memory (ram). If you have a medium to high
end processor, in order to speed up the game, it is recommended that you upgrade your ram. Ram is best run when using two
or more chips to achieve a final speed. Known brand names that work well are Mushkin, Corsair, Kingston, and Kingmax. I currently
run Kingmax and have no troubles what so ever. Well, that does it from me! Enjoy your higher FPS and smooth game play! Thanks!!
Disclaimer;
All material presented here in this manual is provided as is. These options are for personal use at your own
risk. All options and changes are to be done with caution and awareness of your own systems abilitys. These suggestions may
or may not help your game's FPS rate and could possibly hinder your FPS. I am not responsible for anything
that may happen to your computer as a result of these changes. You take full responsibility for making these changes. You
are not authorized to duplicate, alter, and or distribute this manual in any form unless given permission to do
so by Mac 4.0. I claim all copyrights and distribution. Further manual versions may be released in the future with corresponding
version numbers in order starting from Version 1.0. Currently this is version 2.0 of the manual. It is made
to be compatible with the game Falcon 4.0 Allied Force. All screen shots presented in this manual are property of
their creators and company's. Graphic Options is a free distribution name. Microprose, Lead Pursuit, Graphsim Corporation, and their
affiliates have no ties and or representation of this manual. They are not to be contacted by any means that pertain to
this manual. Thank you for your support and coopertion. I wish you all the best of luck. Enjoy! Good luck and God speed!
--All rights Reserved 2007--
Version 2.1C
|
|
|
|
|
|
|
|
|
|
|
|
|
|
|